Hey, cosplayers, gamers, and fiction enthusiasts, and welcome to Teen Fiction Girl! In this post I’ll be making pieces based on the patterns I created in my last two cosplay posts. I’m going to stop linking every previous post, because as this post goes on the list is going to get really long, so I recommend you (if you haven’t already) click on the “Portal 2 Cosplay: Chell” category on the menu up there. ^^
Also, an advance warning: since most of the cosplay process detailed in this post involved me using heat guns and struggling to form plastic and foam before it cooled, there are very few pictures of the process. I’ll do my best to describe it to you, or provide an alternate tutorial/demonstration where I can.
Before I get started on the process, I think I’d better cover the materials I’m using.
Everyone knows what craft foam is, but the key component of these pieces is a material called Worbla. Worbla is a thermoplastic, which means it has a low melting temperature and can be easily heated up and molded. It’s about a millimeter thick, flexible, and a key component in many professional cosplayers’ wardrobes.
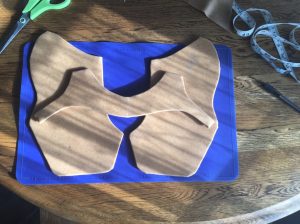
The first thing I did was slightly alter the pattern for the toe piece. It was large enough to fit the boot, but it didn’t wrap far enough around the back, and it was going to cause some weird gaps if I didn’t fix it. I made it a little larger by tracing it onto a piece of posterboard, drawing on the extra width, cutting it out, and taping it on.

I was worried that I might not have enough Worbla for the new, larger pieces, but they turned out great.
At the time I made these components, I had a 15″x19″ piece of Worbla that I’d bought previously just to play with. I also had an enormous roll of craft foam, which is the first thing I used. I traced the patterns onto the foam (once for the ankle piece, twice for the toe piece – you’ll see why in a minute) and cut them out.
I laid each foam piece out onto the Worbla, about an inch apart. I measured 3/4″ all the way around them, traced my new, larger line, and cut it out. (That’s another awesome thing about Worbla: it cuts just fine with scissors.)
Next came the first somewhat dangerous part. Yay, danger!
I got ahold of my trusty heat gun (actually, it’s usually rather unreliable, and extremely hard to turn off – but you get what you get) and heated up the Worbla until it was floppy. I centered the foam on the melted plastic and wrapped the plastic around the edge. I now had three pieces – one ankle piece, two mirrored toe pieces – that looked as though they were made of thick Worbla, when, in reality, they were foam with little Worbla hats on top.
My next step was to make the flat pieces into components of the boot. Remember how I was confusing everyone by talking about the piece that goes on the “bottom”? You’re about to see what I meant.
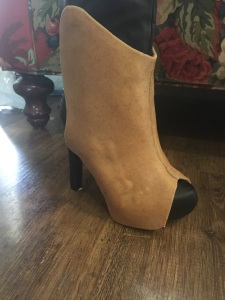
I grabbed the boot I was going to use and stuffed it with plastic bags again. I took one of the mirrored toe pieces and conformed it to the side of the boot. (Sorry I don’t have any pictures!) I took the other piece and did the same, but on the other side of the boot. Now I had two halves of the shell that was going to go over the foot part of the boot. It was sort of like those phone cases where the front piece snaps onto the back piece, if that makes any sense.
My next step was to join them. I heated up both pieces, sandwiched them back onto the boot, and connected them along the front of the foot, so now, instead of having two halves of a “boot case”, I had one “snap-on” one.

This was the final product. Don’t worry about the weird bubbles on the side; I smoothed them out later (and made the Worbla fit more tightly as well).
If this step was a little hard to understand, I’m sorry. Kamui Cosplay has (to the best of my knowledge) never made a pair of long-fall boots, but Svetlana made a pair of bracers using almost the same technique, so, if you want, you can watch this video to better understand what I did.
Now that the toe piece was squared away, I got to work on the ankle piece.
Since I’d done this one a hundred times with the posterboard version, this one was super easy. All I had to do was wrap it around the foot of the boot and connect the parts that needed to be connected.
There were just a couple of hiccups: one, the part that attaches across the front of the foot was slightly too short. When I made my patterns, I hadn’t realized that it was going to be wrapping around the toe and ankle piece, which is a lot thicker than just the boot. It was really easy to make a little foam-and-Worbla square to connect them in the center.
The hardest part was keeping the ankle piece and the toe piece from sticking together. To keep both pieces removable (which was vital at this point, seeing as I hadn’t sanded or painted either piece yet), they needed to stay separate.
When the Worbla cooled, the result was this:
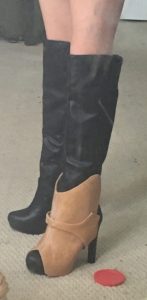
As you can see, the piece wraps around the front and bottom of the boot, with two tabs sticking up (one on each side) for the back piece to attach to. And it goes over the toe piece, which is what I meant when I said that the toe piece would be the lowermost one.
I haven’t done the back piece for a multitude of reasons. I was originally going to use Sintra (a low-density PVC plastic; it smells nasty, but you can heat it with a heat gun as well), but it proved far too industrial for my uses: I couldn’t cut it without power tools, it was nearly impossible to mold, it wouldn’t stick to Worbla (which is kind of vital), and it lets off some pretty nasty fumes when you heat it. I could have used more foam and Worbla, but there were a few things wrong with this too. Firstly, I’d used all my Worbla on the other two pieces, and I didn’t want to buy more without knowing whether my idea was going to work or not. Secondly, I can’t forget about the brace on the back that’ll take the place of the heel: it’s going to have to be strong enough to hold up all of my 110 lb., and there’s no way I’m going to be able to attach something so heavy-duty to something so flexible.
My dad and I did some scheming, and this is the plan we came up with.
We’re going to make the braces out of aluminum bars. The back piece will also be aluminum, with a reinforced piece where the brace will attach; it’ll be riveted to the back part of the toe piece (thank goodness I made my pattern bigger!) and covered in Worbla so it can be easily painted and attached to the appropriate tabs on the ankle piece. Since aluminum is a lot harder to shape than foam (and since my pattern was slightly overlarge anyway, since I forgot to account for the thickness of the finished pieces), I cut a slit in the back of my back piece pattern.
My next order of business is to buy more Worbla and make identical pieces for the other boot. Next time, I swear I’ll take more pictures!!
Thanks for reading, and stay tuned for more updates on this project!


